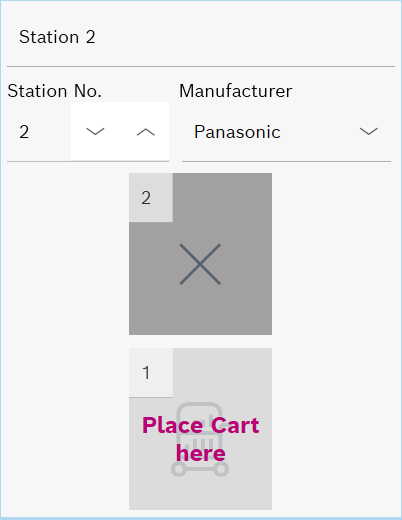
A deactivated table is displayed in the graphical representation with a cross.
To cancel the operation, click ![]() before saving and reply to the prompt in the dialog box with No.
before saving and reply to the prompt in the dialog box with No.
The setup of a station group can be edited without any restrictions. If the station group contains variants of the setup, the subsequent editing of the station group setup is inherited by the variants of the setup.
Additional carts can be added to the variant of the setup of a station group. The stations and tables of a variant of a station group setup cannot be edited.
Adding a variant of the setup to a station group
A station has several tables that can be set up in different ways. Tables can be deactivated, the table mode can be changed, and carts can be assigned to the tables.
The Station Group Setup window displays the setup of the selected station group or the variant of a station group setup in graphic form.
The title of the Station Group Setup window is the name of the station group or variant of the station group setup that is selected in the Station Groups window and is displayed.
Deactivating or activating a table
Tables that are not used in production can be deactivated in the graphical display for the station. Carts cannot be assigned to deactivated tables.
Tables that have a cart assigned cannot be deactivated. To deactivate the table, remove the cart.
A deactivated table is displayed in the graphical representation with a cross.
To cancel the operation, click ![]() before saving and reply to the prompt in the dialog box with No.
before saving and reply to the prompt in the dialog box with No.
The changed station group setup is saved and can be viewed in the Station Group Setup window.
Editing the table mode of a table
Tables can have two different modes:
In the graphical representation of a variant of the setup of a station group, the text Place Cart here is displayed within a variable table.
In the graphical representation of the setup of a station group, the text Place Cart here is displayed within a fixed table.

If a cart is assigned to the table, the cart is removed.
To cancel the operation, click ![]() before saving and reply to the prompt in the dialog box with No.
before saving and reply to the prompt in the dialog box with No.
The changed station group setup is saved and is displayed in the Station Group Setup window.
Assigning a cart to and removing a cart from a table
In the setup of a station group, a cart can only be assigned to a fixed table. In a variant of the setup of a station group, a cart can only be assigned to a variable table.
Within a setup, a cart can only be assigned once.
If a cart is assigned to a table that is already occupied, the previous cart is removed from the table and the new one is assigned to the table.
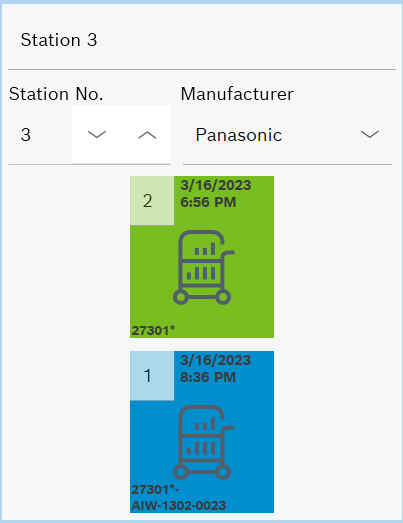
A table to which a cart is assigned is displayed with the cart icon, the date the cart was added to Cart Management and the cart ID.
In a station group setup , all assigned carts are shown in green in the Station Group Setup window. They are passed on to all variants of the setup and are also displayed in green.
In a variant of a station group setup, the carts inherited from the original station group setup are shown in green in the Station Group Setup window. Carts that were added only to the setup variant are shown in blue.
If the same cart is assigned to the same table in all variants of a station group's setup, the table is framed in orange in all variants of the setup and the station group's setup. In this situation, the tables framed in orange can be fixed in the setup of the station group using ![]() .The cart assigned in all variants of the setup is assigned to this table in the setup of the station group.
.The cart assigned in all variants of the setup is assigned to this table in the setup of the station group.
In a variant of the setup of a station group, only the carts shown in blue can be removed. Carts shown in green can only be removed in the original station group setup. The editing of the original setup of the station group is passed on to the variants of the setup.
To cancel the operation, click ![]() before saving and reply to the prompt in the dialog box with No.
before saving and reply to the prompt in the dialog box with No.
The changed setup of the station group or variant of the station group setup is saved and is displayed in the Station Group Setup window.